Karela (Bitter-gourd)- is the bumpy green vegetable that makes me think of a mouse when stuffed and fried. This recipe of karela has a tongue tickling blend of spices that fill my little kitchen with aromas and memories of yesteryears when Ma and Dadi made bharwan karela.
I have two different hastily scribbled recipes in my folder – both labeled karela, both rather incoherent. So here is my attempt to remember how I do what I do to try recreating bharwan karela.
Contents:
Karelas - Six or Seven, about 6 inches in size.
Chopped Garlic - 1 tablespoon
Diced onions - About 2 cups
Tomato paste - 2 tablespoons
Turmeric – ½ teaspoon
Dhaniya Powder – 1 tablespoon
Powdered Panchphoran – 2 teaspoons
Amchoor/khatai – 1 teaspoon
Sugar- 1 teaspoon
Salt- to taste
3 tablespoons of oil
This is a multi step recipe with some degree of concurrency possible. Here’s how I do it:
Roughly peel the karelas and make a lengthwise slit making sure that the top and bottom edges are still well attached. Remove the seeds and other goodies from inside the karela. Don’t throw them out- we need them for our filling. ( And even the seeds that look weirdly brightly red are Ok to use for the filling.) Apply about 1 tablespoon of salt to both the insides and the outsides of the karela and set aside for 10-15 minutes. At this time I also set a pot of water (which can be used as a steamer for karelas) to boil as soon as I am done with peeling the karelas as it takes about 10-12 minutes for water to boil on my ceramic cook-top.
Now, two activities happen in parallel:
Activity one: The Stuffing
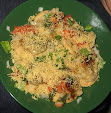
I start heating the frying pan on medium heat with about two tablespoons of oil in it. I also chop the onions. It takes me about 5 minutes to finish with the onions- the same amount of time for the oil to get hot. I add turmeric, dhaniya powder and garlic and wait for the garlic to change colour, and then add the onions. I cook the onions for about 15 minutes- stirring them every 3 minutes or so. I now add the seeds and the innards of the karelas and let everything cook happily for another 6-8 minutes. I then add tomato paste to the onions and stir the contents of the frying pan. After ten minutes of onions and tomatoes getting friendly with each other, I add the flavoring agents- salt, sugar and panchphoran, and turn off the heat. The amchoor is the last thing to go in and then I let it all cool.
Activity two: Prepare the shell
In parallel, while the onions are cooking, I rinse the salt out from the karelas and toss them in the steamer insert of the pot with boiling water. I set a timer to check on the karelas in ten minutes to see if they look done- if they do- turn off the heat and let them come to safe-handling temperature.
Now- to the final phase-
I start with cutting out two feet of white thread to bind each karela with – so six karelas need six separate strings. Then I place a karela across the thread, and gently coax the stuffing inside the karela and then I tie it up making a compact packet. I try to wind the thread across the length of the karela so that all the bits of the karela are kept together. Lather, rinse, repeat for the rest of the shells. (not literally). As soon as I am done with this process, I start heating the frying pan I had used for the filling add the rest of the oil, and add the stuffed karelas to the pan. Cook for about 5 minutes before turning gently. Give about 3 turns and yes- it is now done!
If you are being industrious, use the time while the karelas are cooking to wash and put away the steamer, start up the rice cooker and start heating up frozen parathas. OTOH, you can be like me and go right back to the book you’re reading and set up multiple timers to remind you to flip stuff every five minutes :-)
No comments:
Post a Comment